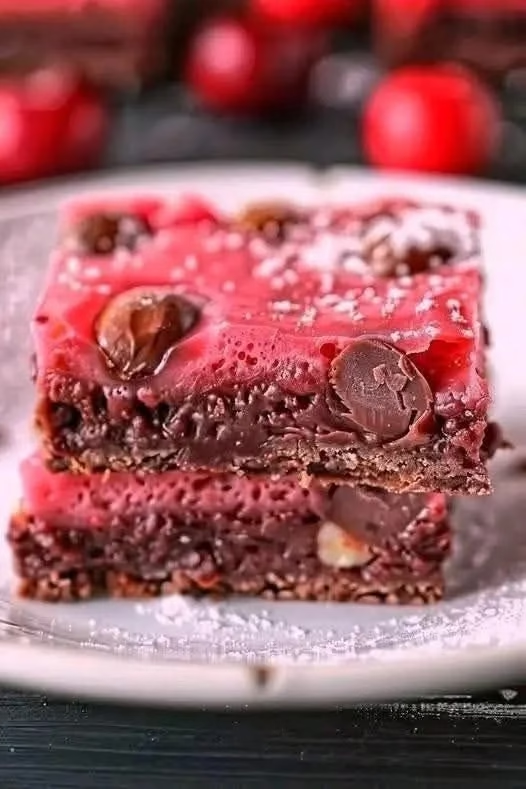
Homemade Cherry Mash Bars: A Sweet Treat Made Easy
When those afternoon cravings hit and you find yourself rummaging through the pantry, let me introduce you to the delightful world of Homemade Cherry Mash Bars. This recipe is like a cozy hug from your favorite dessert—sweet, fruity, and completely satisfying. Whether you’re a busy mom juggling work and kids or someone just looking to whip up something special without breaking a sweat, these cherry mash bars will become one of your go-to treats!
Why You’ll Love These Homemade Cherry Mash Bars
First things first, who doesn’t love a good dessert that’s quick to prepare and even quicker to disappear? With just a few simple ingredients, you’ll have a batch of these yummy cherry bars ready to impress everyone—yes, even your pickiest eaters! Plus, if you’re anything like me, nostalgia will take over as you savor each bite, reminding you of those sweet childhood snacks. So, let’s dive into the cherry goodness together!
Ingredients
To make these scrumptious Homemade Cherry Mash Bars, you’ll need:
- 1 cup all-purpose flour
- 1/2 cup unsweetened cocoa powder
- 1/2 teaspoon baking powder
- 1/4 teaspoon salt
- 1/2 cup unsalted butter, softened
- 3/4 cup granulated sugar
- 1 large egg
- 1 teaspoon vanilla extract
- 1 cup cherry pie filling
- 1/2 cup chocolate chips (optional, but who are we kidding?)
Directions
Preheat your oven: Start off by preheating your oven to 350°F (175°C). Trust me, this is where the magic begins!
Mix dry ingredients: In a medium bowl, whisk together the flour, cocoa powder, baking powder, and salt. This is where you can channel your inner scientist—get those ingredients combusting together!
Cream the butter and sugar: In a large bowl, beat the softened butter and sugar using an electric mixer until it’s light and fluffy—think clouds of sweetness. This step is crucial; fluffy butter means fluffy bars!
Add egg and vanilla: Once your butter-sugar combo is looking dreamy, add the egg and vanilla extract, mixing until completely combined. Smell the love? That’s your vanilla doing its job!
Combine wet and dry: Gradually add the flour mixture to the wet ingredients, mixing at low speed until just combined. Don’t go overboard here; we want to keep that fluffiness intact!
Fold in cherry pie filling: Gently fold the cherry pie filling into your batter. This is the fun part! You get to see those gorgeous red cherries swirl around, like your favorite partner dance.
Spread and sprinkle: Grease an 8×8-inch baking pan (or line it with parchment paper—because we love an easy cleanup!), and pour the batter in evenly. If you’re feeling adventurous, toss in some chocolate chips on top for those chocolate lovers among us.
Bake: Pop your pan in the oven and bake for about 25-30 minutes, or until a toothpick comes out clean. Your kitchen is about to smell heavenly!
Cool and Slice: Once baked, let your bars cool completely before slicing them into squares. Alternatively, you can eat them warm and gooey—no judgment here!
Cooking Tips
Substitution Alert: Out of cherry pie filling? You can always switch it up with any berry filling or even homemade jam! Just think of all the possibilities—blueberry, raspberry…oh my!
Storage: These bars store really well! Place them in an airtight container in the fridge for up to a week. But let’s be honest, they won’t last that long!
If your mixture looks a bit lumpy, don’t worry! That’s the cherry magic at play. Plus, who doesn’t love a little character in their dessert?
A Little Personal Touch
Remember the first time you attempted to bake? I sure do! It was a flour explosion in my kitchen, and I experienced more chaos than cookies. But these Homemade Cherry Mash Bars? They forgive you for any mishaps! They’ve become my go-to dessert for family gatherings because let’s face it—who doesn’t love a sweet treat that requires minimal effort but serves maximal smiles?
FAQs
Can I substitute all-purpose flour in this recipe?
Yes, you can use a gluten-free flour blend if you’re looking for a gluten-free option! Just make sure it’s a 1:1 substitute.How can I store leftovers?
Keep them in an airtight container in the fridge to enjoy them for days! But trust me, leftovers might not last long—you’ll find yourself sneaking bites throughout the day!Can I freeze these bars?
Absolutely! Just wrap them tightly before freezing. I recommend cutting them into squares first, so you can easily grab one when the sweet tooth calls!
The Sweet Wrap-Up
So there you have it—Homemade Cherry Mash Bars that are not just easy to make, but also packed with love and nostalgia. Whether they’re a treat for your family or an indulgent snack for you (no judgment here!), these bars are ready to earn their spot in your recipe rotation.
So grab your apron and get ready to bake some memories with these delightful bars. You won’t regret it—after all, life is too short not to enjoy a little cherry goodness every now and then! 🍒
Meta Description
Homemade Cherry Mash Bars are the perfect sweet treat for busy lives. Quick, easy, and guaranteed to satisfy your cravings. Try it today!
Homemade Cherry Mash Bars
Ingredients
Method
- Preheat your oven to 350°F (175°C).
- In a medium bowl, whisk together the flour, cocoa powder, baking powder, and salt.
- In a large bowl, beat the softened butter and sugar using an electric mixer until light and fluffy.
- Add the egg and vanilla extract to the butter-sugar mixture, and mix until fully combined.
- Gradually add the flour mixture to the wet ingredients, mixing at low speed until just combined.
- Gently fold the cherry pie filling into your batter.
- Grease an 8×8-inch baking pan or line it with parchment paper, then pour the batter in evenly.
- Optionally, sprinkle some chocolate chips on top before baking.
- Bake in the preheated oven for about 25-30 minutes, or until a toothpick comes out clean.
- Let the bars cool completely before slicing them into squares.