Frozen Yogurt Granola Power Cups: Your New Go-To Healthy Snack
Hey there, food lovers! If you’re anything like me, you know that life can get chaotic. Between work, family, and a million other commitments, sometimes healthy eating takes a backseat. Enter the Frozen Yogurt Granola Power Cups—the perfect blend of quick, easy, and oh-so-delicious! These delightful little cups aren’t just a treat for your taste buds; they’re also a wholesome snack that’ll keep you fueled throughout your busy day.
Why You’ll Love These Frozen Yogurt Granola Power Cups
Picture this: it’s midday, you’re at your desk, and your stomach starts grumbling like it’s auditioning for a wildlife documentary. You could reach for the candy bar, but why not grab a Frozen Yogurt Granola Power Cup instead? They’re irresistibly tasty, healthy, and super easy to whip up, making them ideal for busy moms, professionals, or anyone looking for a quick bite without the guilt. Plus, they offer that refreshing sweetness we all crave, especially during the warmer months!
Ingredients for Your Frozen Yogurt Granola Power Cups
Before we jump into the fun part, let’s gather our ingredients. You’ll need the following simple goodies:
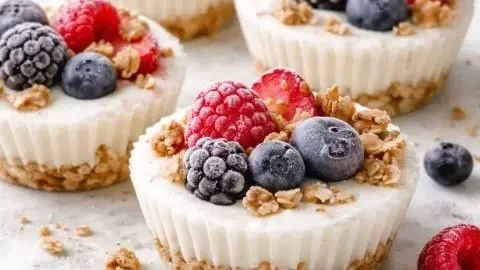
- 2 cups of Greek yogurt (plain or flavored)
- 1 ½ cups of granola (store-bought or homemade)
- 1 cup of mixed fruits (think berries, banana slices, or whatever tickles your fancy)
- 3 tablespoons of honey or maple syrup (for that touch of sweetness)
- 1 teaspoon of vanilla extract (because life’s too short for boring flavors)
- Optional toppings: shredded coconut, nuts, or chocolate chips—because more is more!
Steps to Create These Delicious Cups
Now that we have our ingredients, let’s get this party started!
Mix it Up: In a large bowl, combine the Greek yogurt, honey or maple syrup, and vanilla extract. Stir until everything is well blended and creamy. Seriously, don’t skip this step. It’s where the magic happens!
Layer the Ingredients: Grab your favorite silicone muffin cups (trust me, they’ll save you a ton of scrubbing later) and start layering. Begin with a spoonful of the yogurt mixture at the bottom.
Add Granola & Fruit: Sprinkle a layer of granola on top of the yogurt, then toss in some mixed fruits. Feel free to go wild here—mix and match those fruits like it’s a fruit salad fashion show!
Repeat the Layers: Continue layering until you fill the cups to the brim. Top off each cup with a dollop of yogurt, a sprinkle of granola, and any additional toppings you like.
Freeze: Place the cups in the freezer and let them chill out for at least 2-3 hours, or until they are completely frozen. The hardest part is the waiting, I know!
Enjoy: Once frozen, pop them out of the cups like a pro, and voilà! Your Frozen Yogurt Granola Power Cups are ready to be devoured. Enjoy them as a mid-morning snack, post-workout boost, or dessert—no judgment here.
Cooking Tips
Fruit Options: Don’t be afraid to experiment with seasonal fruits. Strawberries, mangoes, or even a handful of nuts can add different textures and flavors that will make your cups feel unique every time!
Granola Variations: If you’re feeling adventurous, you can even make your granola at home! (Psst, check out my easy homemade granola recipe for a fun project!)
Serving Suggestions: These cups can be stored in an airtight container for up to a week. But trust me, they’ll probably vanish faster than your toddler can make a mess!
FAQs
Can I substitute Greek yogurt in this recipe?
Absolutely! You can use regular yogurt, dairy-free yogurt, or even cottage cheese if you’re feeling healthy—just know the texture may vary a bit.
How can I store leftovers?
Store them in an airtight container in the freezer, and they’ll be good for about a week. Just take them out when you need a refreshing snack!
Can I make these cups in advance?
You bet! They’re perfect for meal prepping. Make a batch on the weekend, and you’ll have healthy snacks ready all week long.
Now that you’re armed with this fabulous recipe, I encourage you to give these Frozen Yogurt Granola Power Cups a shot. They’re quick, healthy, and one of those delightful snacks that will make your kitchen feel like a cozy little haven of health and happiness.
So gather your ingredients, pull out those muffin cups, and let’s make some family memories—one delicious bite at a time!
Happy snacking!
Meta Description: Frozen Yogurt Granola Power Cups are the perfect healthy snack. Quick, easy, and delicious, this recipe will become your go-to treat!
Frozen Yogurt Granola Power Cups
Ingredients
Method
- In a large bowl, combine the Greek yogurt, honey or maple syrup, and vanilla extract. Stir until well blended and creamy.
- Grab your favorite silicone muffin cups and begin layering. Start with a spoonful of the yogurt mixture at the bottom.
- Sprinkle a layer of granola on top of the yogurt, then add some mixed fruits.
- Continue layering until the cups are filled. Top with a dollop of yogurt, granola, and any desired toppings.
- Place the cups in the freezer and let them chill for at least 2-3 hours, or until completely frozen.
- Once frozen, pop them out of the cups and enjoy as a snack, post-workout boost, or dessert.