Indulge in Decadence: Chocolate Wafers with Cream
Ah, chocolate wafers with cream! Is there a better treat that epitomizes comfort and indulgence? This delightful recipe not only satisfies that sweet tooth but also brings a little bit of joy into our busy lives. Whether you’re rounding up the kids for snack time or looking to treat yourself after a long day, these chocolate wafers are the perfect solution. Trust me, they’re quick, easy, and absolutely delicious—just the way we like it!
Why You’ll Love This Chocolate Wafers with Cream Recipe
Every fun and memorable gathering usually has a star dessert. With chocolate wafers and cream, prepare to cuddle up in the center of attention! This recipe is perfect for hosting a last-minute get-together or simply snuggling on the couch with your favorite show. What’s more comforting than a rich chocolate crunch coupled with creamy goodness?
Let’s be real—some days feel like a marathon of endless to-do lists. This recipe is a reminder that we can whip something scrumptious together with just a few pantry staples. So, grab your apron, and let’s embark on this delicious adventure together!
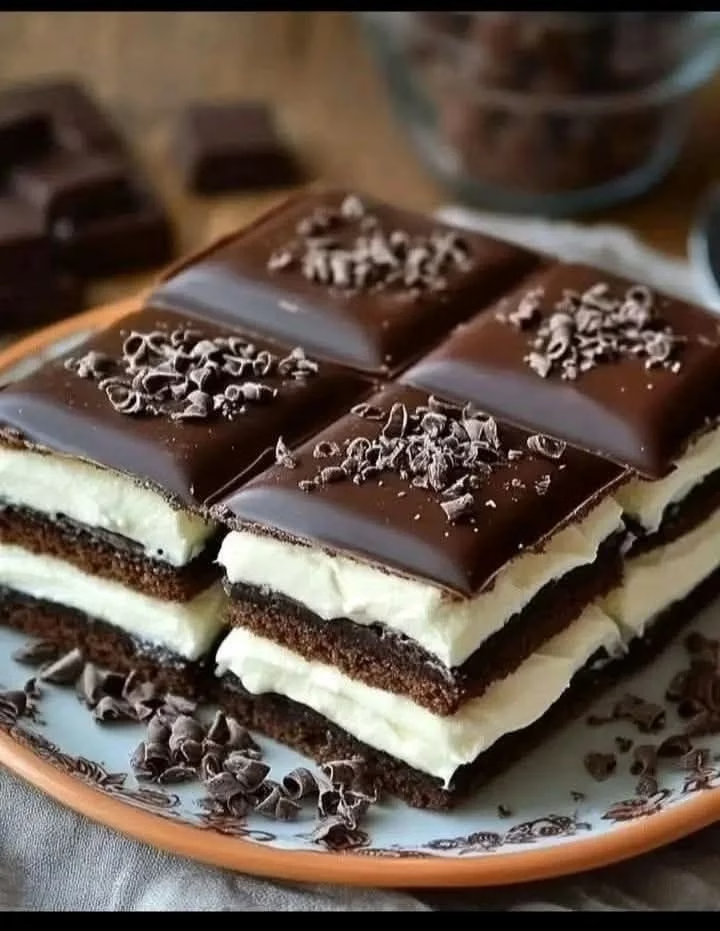
Ingredients
Before we dive into the gooey goodness, let’s gather our ingredients. Here’s what you’ll need to create this mouthwatering treat:
- 1 package of chocolate wafers
- 1 cup heavy cream
- 1 cup powdered sugar
- 1 teaspoon vanilla extract
- A pinch of salt (just to keep things interesting!)
Wow, it only requires a handful of ingredients! You might even have most of them lying around your kitchen. Now, let’s get to work!
Steps to Sweet Success
Whip It Up: In a large mixing bowl, beat the heavy cream with an electric mixer on medium speed until it begins to thicken. Add the powdered sugar, vanilla extract, and a pinch of salt. Continue to beat until soft peaks form. You’d think you were creating clouds of deliciousness!
Layering Delight: Take a chocolate wafer and generously spread a dollop of the whipped cream mixture on top. Be generous—this is no time to skimp on cream! Place another wafer on top, creating a delightful little sandwich. Repeat this process until you’ve used all your wafers.
Chill Time: Once your delightful stacks are complete, stack them on a serving platter and refrigerate for an hour. I know it’s tough to wait, but trust me—it’s worth it! The chocolate will soften slightly, and the cream will firm up perfectly.
Enjoy: When your hour is up, slice into those heavenly creations and indulge. Serve with a smile, and watch everyone dive in, leaving nothing behind but crumbs.
Cooking Tips for Perfect Chocolate Wafers
- Flavor Boost: For a little extra zing, try adding a pinch of cinnamon or a splash of almond extract to your whipped cream. It’ll elevate the flavors to a whole new level!
- No Mixer? No Problem: If you don’t have an electric mixer, a good old-fashioned whisk will do the job—just be prepared for a mini arm workout!
- Gone Too Soon?: These chocolate wafers can easily disappear in a matter of minutes. If you’re hoping for leftovers, consider making a double batch—or hiding some in the back of the fridge. We won’t tell!
A Sweet Family Tradition
Whenever I whip up these chocolate wafers, I can’t help but think of my childhood—the joy of coming home to a kitchen filled with the rich aroma of chocolate, often thanks to my amazing sister Patricia. We’d gather around the dining room table, excitement buzzing as we devoured every layer. This recipe has since become one of our go-to treats for family gatherings, bringing love and laughter back to our kitchen.
FAQs
Can I substitute heavy cream?
Absolutely! If you’re looking for a lighter option, half-and-half can work in a pinch. Just note that the whipped cream might not be quite as thick.How do I store leftovers?
If you manage to have any leftovers (which is a big if!), just cover them tightly with plastic wrap and keep them in the refrigerator. They’ll stay good for a couple of days.Can I make these ahead of time?
Yes! In fact, they taste even better when they’ve had some time to chill and marry those delicious flavors. Just make sure to keep the wafers stored in the fridge until you’re ready to serve.
So, are you ready to dive into the delightful world of chocolate wafers with cream? Indulgence awaits! These treats are an easy way to sprinkle joy into busy days, impress guests, or simply pamper yourself after a hectic afternoon. Trust me, each layer is a bite of happiness that’ll keep you coming back for more.
For more sweet inspiration, don’t forget to check out my classic chocolate chip cookies recipe sure to make you swoon!
Meta Description: Chocolate wafers with cream are the perfect quick, easy, and delicious treat. Try this recipe for a delightful snack or dessert that everyone will love!
Chocolate Wafers with Cream
Ingredients
Method
- In a large mixing bowl, beat the heavy cream with an electric mixer on medium speed until it begins to thicken.
- Add the powdered sugar, vanilla extract, and a pinch of salt. Continue to beat until soft peaks form.
- Take a chocolate wafer and generously spread a dollop of the whipped cream mixture on top.
- Place another wafer on top, creating a sandwich. Repeat until all wafers are used.
- Stack the layered wafers on a serving platter and refrigerate for one hour.
- After chilling, slice into the creations and serve with a smile!