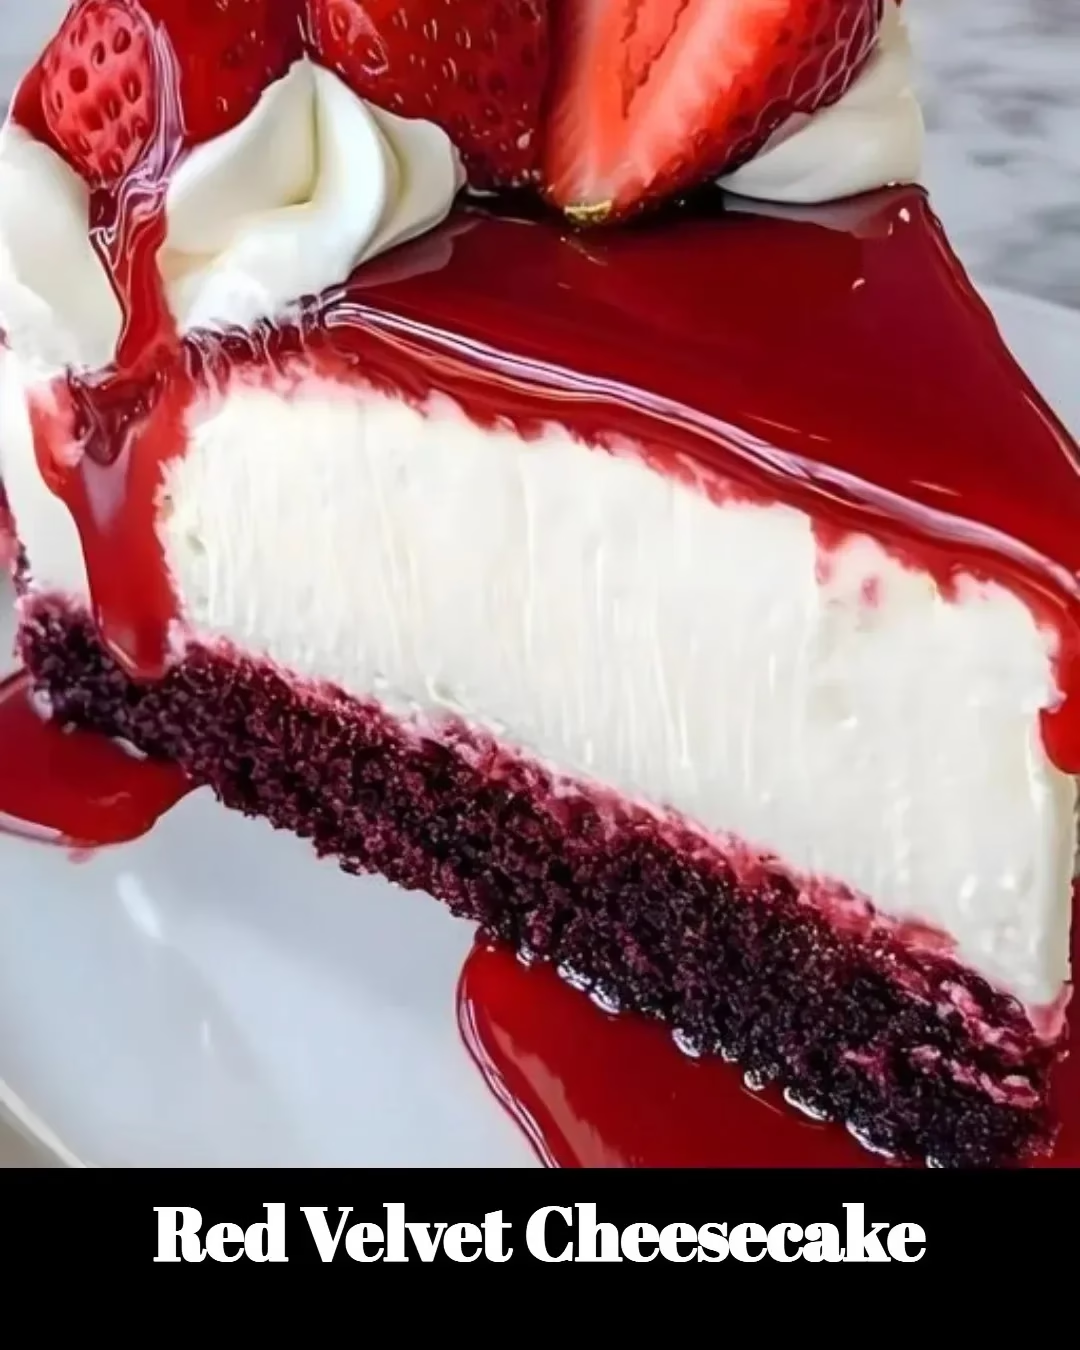
(Primary Keyword): Irresistible Red Velvet Cheesecake for Busy Lives
If you’re juggling work, family, and the eternal quest for dessert that looks impressive but doesn’t eat your whole Sunday, this (Primary Keyword) Red Velvet Cheesecake is here to save the day. Think creamy cheesecake with that classic red velvet charm — a treat that impresses guests, makes picky eaters smile, and rewards you for all that calendar-wrangling. I promise it’s worth the few extra minutes on a weeknight (and perfect for birthdays, holidays, or just because).
Before we dive in, if red-velvet-y goodness makes you happy in pastry form, you might also enjoy my take on red velvet cinnamon rolls — they’re a cozy companion to this cheesecake and one of my favorite weekend treats. Check them out here: red velvet cinnamon rolls recipe.
Why You’ll Love This (Primary Keyword)
- It’s show-stopping without requiring pastry school.
- The texture is rich and velvety, but not overly sweet.
- Great for feeding a crowd — or hoarding in the freezer like a proud dessert ninja.
This recipe blends the tang of cream cheese with the cocoa-kissed warmth of red velvet, creating a dessert that’s both nostalgic and elegant. (Secondary Keywords) pop up naturally throughout the instructions, so if you’re searching for helpful tips or ingredient swaps, you’ll find them as you scroll.
Recipe Snapshot
Recipe Name: (Recipe Name)
Ingredients and Directions: (Recipe Ingredients and Instructions)
Full ingredients and step-by-step directions are below — written in a friendly, straight-forward way so you won’t need to keep bouncing between tabs while baking.
Ingredients
- 1 1/2 cups graham cracker crumbs (or chocolate wafer crumbs for extra depth)
- 3 tbsp granulated sugar
- 6 tbsp unsalted butter, melted
- 3 (8-oz) packages cream cheese, room temperature
- 1 1/4 cups granulated sugar
- 1 tsp vanilla extract
- 3 large eggs, room temperature
- 1/2 cup sour cream
- 2 tbsp unsweetened cocoa powder
- 2 tbsp red food coloring (or natural beet powder for a subtler color)
- 1 tsp white vinegar
- 1 tsp vanilla extract (again — yes, for extra flavor)
- For the topping (optional): whipped cream, cream cheese frosting, or chocolate shavings
Directions
- Heat the oven to 325°F (160°C). Prepare a 9-inch springform pan: wrap the outside in aluminum foil (water bath friendly—more on that below) and spray the inside with nonstick spray.
- Make the crust: Mix graham cracker crumbs, 3 tablespoons sugar, and melted butter until the texture resembles wet sand. Press the mixture into the bottom of the springform pan, using the back of a measuring cup for even pressure. Chill in the fridge while you prepare the filling.
- Beat the cream cheese: In a large bowl, beat the cream cheese until smooth and fluffy using a mixer on medium speed. Scrape the sides so there are no lumps.
- Add sugar and vanilla: Slowly add 1 1/4 cups sugar, then 1 teaspoon vanilla, beating until combined and velvety.
- Add eggs: Add the eggs one at a time, beating just until combined after each. Overbeating introduces air and can cause cracks, so be gentle.
- Mix sour cream and cocoa: Fold in the sour cream and cocoa powder until the batter is evenly colored. The cocoa gives red velvet its chocolate hint.
- Color and acid: Stir in the red food coloring, white vinegar, and the extra teaspoon of vanilla. The vinegar helps the batter react and deepen the red tone; it’s a small trick that makes a big difference.
- Assemble: Pour the cheesecake mixture over the chilled crust, smoothing the top with a spatula.
- Bake in a water bath: Place the springform pan into a larger roasting pan. Pour hot water into the outer pan so it reaches halfway up the sides of the springform (this prevents cracks). Bake for 55–70 minutes, or until the edges are set and the center jiggles slightly when nudged.
- Cool gradually: Turn off the oven and crack the door open. Let the cheesecake sit in the warm oven for 30 minutes to cool gently—this helps prevent sudden temperature shifts and cracks.
- Chill: Remove from the oven, run a thin knife around the edge to loosen, and chill uncovered until cold. Cover and refrigerate at least 4 hours, preferably overnight.
- Top and serve: Remove the sides of the springform, decorate with whipped cream or a cream cheese frosting, and add chocolate shavings or crumbs for contrast. Slice with a hot, clean knife for cleaner cuts.
A few quick notes while you bake:
- Room-temperature ingredients mix more evenly, reducing lumps.
- The water bath is your best friend for a silky, crack-free cheesecake.
- If you prefer, you can swirl a thin layer of cream cheese frosting on top instead of full piping.
Step-by-Step Tips (Because life is busy)
- Prep at night: If evenings are your only free time, make the crust and filling in the evening, then bake the next morning. Refrigerating the crust for at least 15 minutes makes it easier to pour the filling without disturbing it.
- Use an oven thermometer: Home ovens can run hot or cold. A thermometer helps you avoid overbaking (and dry cheesecake).
- No springform pan? Use a regular 9-inch pan and line it with parchment so you can lift it out. You’ll lose the classic tall sides, but the taste is the same.
- Want a faster version? Make mini cheesecakes in a muffin tin — they bake quicker and are perfect for parties.
Practical Substitutions (a.k.a. “I’m out of X”)
- Cream cheese: Don’t use low-fat versions—they change texture. If you must, blend in a tablespoon of cornstarch to help firmness.
- Red food coloring: A little beet powder mixed with a drop or two more will give you color without artificial dyes.
- Sour cream: Plain Greek yogurt works in a pinch and adds a little tang.
Personal Anecdote: Why I Keep Making This
Sisters Patricia and I perfected this cheesecake for a family anniversary. I was trying to impress my husband’s mom — no small feat — and the kitchen smelled like cocoa and nostalgia. Patricia cheered me on (and stole the first slice). Since then, if I need to make a crowd smile — birthday, potluck, or a Tuesday that needs cheering — this Red Velvet Cheesecake is my go-to. It’s comfort with a little drama, kind of like a good romantic movie that also has a killer soundtrack.
(Secondary Keywords) and Common Questions
Q: Can I make this ahead of time?
A: Absolutely. Make it the day before; chilling helps the flavor develop. You can even freeze it for up to a month—wrap tightly.
Q: Why did my cheesecake crack?
A: Most cracks come from overbeating or sudden temperature changes. Use a water bath and cool it gradually in the oven; that usually does the trick.
Q: Can I reduce sugar?
A: You can shave a couple of tablespoons, but sugar affects texture. If you want less sweetness, balance with a tart topping like berries.
Q: How do I get a deep red color?
A: Use a concentrated gel food coloring or slightly more liquid dye. Natural options like beet powder will tint it but rarely match the vivid red of artificial dye.
Serving and Presentation Ideas
- Garnish with piped cream cheese frosting rosettes and a dusting of cocoa for a classic look.
- Top with fresh raspberries or strawberries for a pop of color and bright flavor.
- Serve with a small spoonful of salted caramel on the side for an adult twist.
My Favorite Tools for Success
- Springform pan (9-inch): Tall sides help achieve that bakery look.
- Electric mixer: You’ll get the smooth texture without arm ache.
- Roasting pan large enough for a water bath: Stability matters.
- Offset spatula: For smoothing the top like a pro.
Want a breakfast-y red velvet option to match the cheesecake vibe? For Valentine’s or special mornings, try our red velvet Valentine’s cinnamon rolls — they pair annoyingly well with coffee and compliments: red velvet valentines cinnamon rolls.
A Few Troubleshooting Moments (Because baking is part science, part therapy)
- If your center is still wobbling after the recommended time, give it 5–10 more minutes and check again. It should be slightly jiggly but not liquidy.
- If you’re seeing small bubbles on the top, tap the pan gently before baking to release trapped air.
- If the crust gets soggy, bake it blind for 8–10 minutes before pouring in the filling.
FAQs — Quick and Handy
Q: Can I halve this recipe?
A: Yes, but use a smaller pan and reduce baking time. Adjustments can be finicky; stick with full recipe if you’re newer to baking.
Q: How should I store leftovers?
A: Covered in the fridge up to 5 days. Freeze slices individually wrapped for longer storage.
Q: Can I make it dairy-free?
A: Not easily. Cheesecake relies on cream cheese. For dairy-free, consider a dairy-free cheesecake recipe that uses tofu or vegan cream cheese.
A Note on (Secondary Keywords)
You’ll see (Secondary Keywords) sprinkled through the article because they’re helpful touchpoints for swaps, texture tips, and storage ideas. They’re meant to help you find the small fixes that save time and reduce stress—especially on busy weeknights.
Bringing It Together
Baking this (Primary Keyword) Red Velvet Cheesecake isn’t about being perfect. It’s about showing up, stacking flavors you love, and creating moments — big or small — with people you care about. Whether you’re making this for a milestone or to celebrate that you survived Monday, it’s a dessert that makes the effort feel like love on a plate.
Conclusion
If you want extra inspiration or a slightly different take on Red Velvet Cheesecake, take a peek at this gorgeous version from Life Love & Sugar for ideas on presentation and finishing touches: The Ultimate Red Velvet Cheesecake | Life Love & Sugar. For another delicious adaptation and cake-style approach, Recipe Girl has a lovely Red Velvet Cheesecake Cake that’s worth checking out: Red Velvet Cheesecake Cake – Recipe Girl.
Meta description (150 characters)
(Primary Keyword) makes a show-stopping Red Velvet Cheesecake for busy women—easy to follow, creamy, and perfect for family celebrations. Try it now!!
Enjoy baking — and if you try this recipe, drop a note and tell me how it turned out. Patricia and I love hearing your kitchen wins and happy tweaks.
Red Velvet Cheesecake
Ingredients
Method
- Heat the oven to 325°F (160°C). Prepare a 9-inch springform pan: wrap the outside in aluminum foil and spray the inside with nonstick spray.
- Make the crust: Mix graham cracker crumbs, 3 tablespoons sugar, and melted butter until the texture resembles wet sand. Press the mixture into the bottom of the springform pan and chill in the fridge.
- Beat the cream cheese in a large bowl until smooth and fluffy. Scrape the sides to avoid lumps.
- Slowly add 1 1/4 cups sugar and 1 teaspoon vanilla, beating until combined and velvety.
- Add eggs one at a time, beating just until combined after each to avoid cracks.
- Fold in sour cream and cocoa powder until the batter is evenly colored.
- Stir in red food coloring, white vinegar, and extra teaspoon of vanilla.
- Pour the cheesecake mixture over the chilled crust, smoothing the top.
- Place the springform pan into a larger roasting pan. Pour hot water into the outer pan until it reaches halfway up the sides of the springform.
- Bake for 55–70 minutes, until edges are set and the center jiggles slightly.
- Turn off the oven and crack the door open. Let the cheesecake sit in the warm oven for 30 minutes to avoid sudden temperature shifts.
- Remove from oven, run a thin knife around the edge to loosen, and chill uncovered until cold. Cover and refrigerate for at least 4 hours, preferably overnight.
- Remove the sides of the springform, decorate, and slice with a hot knife.