Mini Cheesecakes: Little Desserts, Big Smiles
There’s something about Mini Cheesecakes that feels like a secret handshake between you and dessert—small, elegant, and somehow totally forgiving when life (or the oven) gets a little chaotic. If you’re a busy mom, a working professional, or anyone who loves to feed kids, friends, or a sweet tooth with minimal fuss, this mini cheesecake recipe is your new go-to. Want a savory snack idea to balance your dessert spread? You might also enjoy our crispy mini blooming onions in the air fryer for a playful contrast.
I’m Anna, and along with my sister Patricia, we test, tweak, and taste everything until it makes our kitchen feel like a little party. These Mini Cheesecakes are the kind of dessert that makes hosting feel effortless and gives you room to breathe between life’s many to-dos.
Why You’ll Love This Mini Cheesecakes
- They’re quick: ready in about an hour from start to finish (including baking and a short chill).
- They’re portable: perfect for potlucks, bake sales, and school treats.
- They’re forgiving: a few lumps or slightly cracked tops? No one will notice once they take a bite.
- They’re customizable: swap toppings, crusts, or flavor extracts to match your mood or pantry.
Whether you need “dessert now” energy or a batch to freeze for last-minute guests, these mini delights have your back.
Ingredients
Makes about 12 mini cheesecakes (standard muffin tin)
For the crust:
- 1 1/2 cups graham cracker crumbs (about 10 full sheets, finely crushed)
- 3 tablespoons granulated sugar
- 6 tablespoons unsalted butter, melted
For the filling:
- 16 oz (450 g) cream cheese, room temperature
- 1/2 cup granulated sugar
- 1 large egg, room temperature
- 1/2 cup sour cream (or plain Greek yogurt)
- 1 teaspoon vanilla extract
- 1 tablespoon lemon juice (optional — brightens the flavor)
Toppings (choose any):
- Fresh berries (strawberries, raspberries, blueberries)
- Fruit compote or jam
- Chocolate ganache or mini chocolate chips
- Caramel sauce or a dusting of powdered sugar
(Substitutions: For a gluten-free crust, use gluten-free graham crumbs. For a lighter version, swap half the cream cheese for mascarpone or cream-cheese-style vegan spread—see FAQs below for more.)
Directions — Step-by-step (Easy mini cheesecakes)
These steps are written to keep things simple and calm—like an encouraging friend beside your mixing bowl.
Preheat and prep:
- Preheat your oven to 325°F (163°C). Line a standard 12-cup muffin tin with paper liners, or spray well with nonstick cooking spray if skipping liners.
Make the crust:
- Combine graham cracker crumbs and 3 tablespoons sugar in a medium bowl. Pour in melted butter and stir until crumbs are evenly moistened and hold together when pressed.
- Press about 1 tablespoon of crust mixture firmly into the bottom of each muffin cup to form an even layer. Use the bottom of a shot glass or measuring spoon for neat, compact crusts.
- Bake the crusts for 5 minutes, then remove and let them cool slightly while you prepare the filling.
Prepare the filling:
- In a large bowl, beat room-temperature cream cheese until smooth and creamy (no lumps!). Add 1/2 cup sugar and mix until combined.
- Add the egg and beat until incorporated, scraping the sides of the bowl.
- Blend in sour cream (or Greek yogurt), vanilla extract, and lemon juice if using. Mix just until smooth—overbeating can add air and lead to cracks.
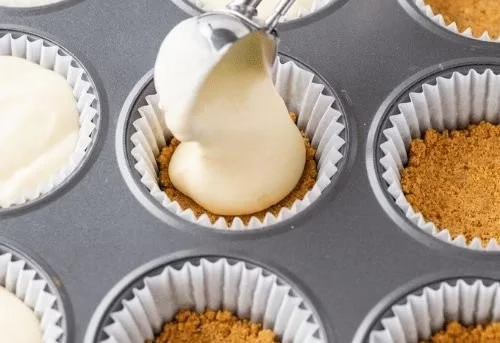
Fill the cups:
- Spoon the filling over the pre-baked crusts, filling each cup almost to the top (about 3/4 to 7/8 full). A small cookie scoop keeps portions even.
Bake gently:
- Bake at 325°F (163°C) for 15–18 minutes, until the centers are set but slightly jiggly—like a well-made jello. The edges may puff a touch and the tops should be mostly smooth.
- If you’re nervous about cracking, you can bake these in a water bath (place the muffin tin in a larger roasting pan and add hot water to come halfway up the muffin tin). It’s optional but helps keep the texture silky.
Cool and chill:
- Remove the tin to a wire rack and let the cheesecakes cool to room temperature. Once cool, chill in the refrigerator for at least 1–2 hours before topping and serving. Overnight makes them taste even better.
Top and enjoy:
- Add fresh fruit, a drizzle of chocolate, or a spoonful of jam just before serving. These are best within 3 days refrigerated.
Tip: To remove cheesecakes from the muffin tin cleanly, run a thin knife around the edge of each liner if you used spray, or peel the liner off gently if you used paper cups.
Helpful Cooking Tips (so you don’t flip out if life interrupts baking)
- Room temperature ingredients matter: Cold cream cheese makes lumpy filling. If you forget to set it out, microwave in 5-second pulses until just softened.
- Avoid overmixing: A few flutters in the center are okay; too much air causes cracking. Stir gently and stop when smooth.
- Make-ahead friendly: You can bake the cheesecakes a day ahead and add toppings just before serving. Want to freeze? Wrap cooled cheesecakes individually and freeze up to 1 month.
- Crust hacks: Short on graham crumbs? Digestive biscuits or vanilla cookies work well. For a nutty twist, pulse almonds or pecans into the crumb mix.
- Fancy without fuss: Pipe the filling into liners with a Ziploc bag (cut the corner) for tidy results and less cleanup.
A Quick Personal Note
These mini cheesecake moments started when Patricia and I hosted a last-minute book club and realized I’d promised dessert without planning. Panic + pantry raid led to this recipe—small, forgiving, and portable. Everyone loved them, and I realized single-serving sweets are the secret to guilt-free indulgence and zero plate-division drama at gatherings.
If you need an easy snack to pair with these sweet bites for a party menu, try our savory counterpart: crispy mini blooming onions. They’re chaotic in the best possible way.
FAQs (mini questions, big help)
Q: Can I make mini cheesecakes without a muffin tin?
A: Yes. You can use silicone muffin cups on a baking sheet, but paper liners in a muffin tin hold the shape best. If you want slightly larger servings, double the recipe in a regular 9-inch springform pan and adjust baking time (about 30–35 minutes).
Q: Can I use low-fat cream cheese or Greek yogurt?
A: For a lighter texture, you can substitute part of the cream cheese with Greek yogurt, but expect a slightly tangier, less dense cheesecake. Low-fat cream cheese will work, but full-fat yields the creamiest results.
Q: How do I prevent cracks on the top?
A: Avoid overmixing and don’t over-bake. A gentle water bath reduces temperature shock. Cracks aren’t a flavor problem—top with fruit or sauce and no one will notice.
Q: Can I make these dairy-free or vegan?
A: Yes. Use vegan cream cheese and a plant-based yogurt. Baking time is similar, but textures vary—test one as a sample first.
Q: How should I store leftovers?
A: Refrigerate in an airtight container for up to 3 days. For longer storage, freeze individually wrapped cheesecakes for up to a month. Thaw in the fridge overnight.
(You might notice I used "mini cheesecake recipe" and "easy mini cheesecakes" throughout—just trying to be helpful for your search and pantry!)
Serving Ideas & Variations
- Berry Bliss: Top with a warmed berry compote and a sprig of mint.
- Chocolate Lover: Stir 2 tablespoons of cocoa powder into the filling for a chocolate base, then top with ganache.
- Lemon Poppy: Add 1 teaspoon lemon zest and 1/2 teaspoon poppy seeds to the filling for a bright twist.
- Salted Caramel: Drizzle salted caramel and sprinkle flaky sea salt for an indulgent combo.
- No-sugar option: Use a sugar substitute suitable for baking and sugar-free jam.
These variations keep your menu fresh and let you match the holiday, season, or whatever snack craving shows up.
Final Serving Notes
These mini cheesecakes work beautifully for busy households. Make a batch on Sunday, and you’ll have an easy dessert ready when surprise guests arrive—or when the kids finish piano lessons and need a celebratory reward. They’re elegant enough for grown-up company and forgiving enough for weekday life.
Conclusion
Mini Cheesecakes are a little miracle in a cupcake liner—quick to make, easy to customize, and always a crowd-pleaser. If you want a tutorial with a slightly different method and photos, check out this Sally’s Baking mini cheesecake recipe for step-by-step visuals. For another approachable take with handy tips and topping ideas, I like this Live Well Bake Often mini cheesecakes post.
Happy baking—from my kitchen to yours. Don your apron, grab a spoon, and let these little cheesecakes make someone’s day sweeter.
Meta description (150 characters):
Mini Cheesecakes: A quick, easy mini cheesecake recipe for busy moms. Delightful, crowd-pleasing treats ready in under an hour—perfect for parties!!!
Mini Cheesecakes
Ingredients
Method
- Preheat your oven to 325°F (163°C). Line a standard 12-cup muffin tin with paper liners, or spray well with nonstick cooking spray if skipping liners.
- Combine graham cracker crumbs and 3 tablespoons sugar in a medium bowl. Pour in melted butter and stir until crumbs are evenly moistened and hold together when pressed.
- Press about 1 tablespoon of crust mixture firmly into the bottom of each muffin cup to form an even layer. Use the bottom of a shot glass or measuring spoon for neat, compact crusts.
- Bake the crusts for 5 minutes, then remove and let them cool slightly while you prepare the filling.
- In a large bowl, beat room-temperature cream cheese until smooth and creamy (no lumps!). Add 1/2 cup sugar and mix until combined.
- Add the egg and beat until incorporated, scraping the sides of the bowl.
- Blend in sour cream (or Greek yogurt), vanilla extract, and lemon juice if using. Mix just until smooth—overbeating can add air and lead to cracks.
- Spoon the filling over the pre-baked crusts, filling each cup almost to the top (about 3/4 to 7/8 full). A small cookie scoop keeps portions even.
- Bake at 325°F (163°C) for 15–18 minutes, until the centers are set but slightly jiggly—like a well-made jello. The edges may puff a touch and the tops should be mostly smooth.
- If you’re nervous about cracking, you can bake these in a water bath (place the muffin tin in a larger roasting pan and add hot water to come halfway up the muffin tin). It’s optional but helps keep the texture silky.
- Remove the tin to a wire rack and let the cheesecakes cool to room temperature. Once cool, chill in the refrigerator for at least 1–2 hours before topping and serving. Overnight makes them taste even better.
- Add fresh fruit, a drizzle of chocolate, or a spoonful of jam just before serving. These are best within 3 days refrigerated.