Homemade Cheese: Your New Kitchen Adventure Awaits!
Ah, homemade cheese—the delectable delight that brings a little magic to your everyday meals. Whether you’re throwing together a casual charcuterie board for a weekend gathering or simply sneaking a bite while standing at the kitchen counter (we’ve all been there, right?), making cheese at home can be a fulfilling and surprisingly easy task. As someone who’s had their fair share of kitchen triumphs and misadventures, I can tell you this: there’s nothing quite like the satisfaction of crafting your own creamy cheese—almost like you’ve unlocked a new level in your culinary journey!
So, for all the busy mommas, professionals, and home chefs ready to step up their game in the kitchen, let’s embrace the art of cheese-making together. It might just be that perfect recipe you didn’t know you were missing!
Why You’ll Love This Homemade Cheese
First off, homemade cheese is kinder to your wallet than splurging on artisanal wheels from fancy cheese shops. Plus, it’s way more fun to say “I made that!” when someone asks about your dinner spread. And let’s face it—who doesn’t want to impress their friends with a personalized cheese creation? It’s the quintessential way to elevate your good ol’ snack platter and gives your family a gourmet experience without the gourmet price tag.
Ingredients
For this delightful cheesemaking journey, you’ll need a handful of simple ingredients:
- 1 gallon whole milk (the richer, the creamier)
- 1/4 cup white vinegar (this will be our magic ingredient)
- 1 teaspoon salt (to taste; because cheese isn’t cheese without a little seasoning)
Optional Add-Ins for Flair:
- Fresh herbs (think chives or basil)
- Spices like paprika for a kick
- Garlic powder or crushed pepper for an extra zing
Steps to Create Your Own Homemade Cheese
Now, let’s get our hands cheesy! Here’s how to whip up your very own homemade cheese in a few easy steps:
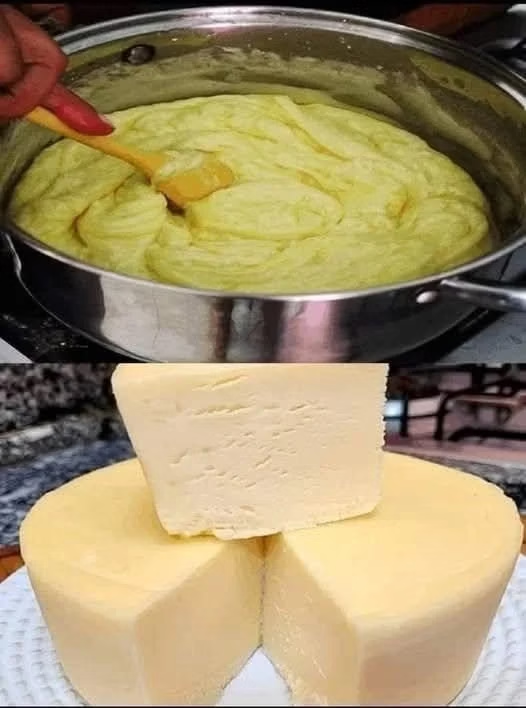
Heat the Milk: In a large saucepan, pour in that glorious gallon of whole milk. Heat it over medium heat until it’s steaming but not boiling. This should make your kitchen smell divine—consider it a sneak preview of what’s to come!
Add the Vinegar: Once your milk is nice and warm, reduce the heat to low and stir in the vinegar. You’ll start to see the curds and whey separate—this is the moment you’ve been waiting for! Let it sit for about 10 minutes, giving it time to do its magic.
Strain the Curds: Grab a fine mesh strainer, and line it with a cheesecloth or coffee filter. Pour the curds and whey into the strainer, allowing the liquid to drain out. Gather the edges of the cloth and gently squeeze—don’t worry if some liquid seeps out; that’s normal!
Season Your Cheese: After draining, place the curds in a bowl and mix in salt to taste. This is also the perfect moment to add any optional ingredients like herbs or spices for a personal touch!
Chill and Enjoy: Transfer the cheese into a container and refrigerate for at least an hour before indulging. This will allow the flavors to meld together. Then, voila! You’ve got yourself a dreamy cheese that’s ready for spreading, dipping, or just plain munching.
Cooking Tips for Cheese-Making Success
If you find yourself with a particularly lumpy cheese, don’t fret! Those lumps add character. In the culinary world, we call that “rustic charm”—just like when you set out to craft a beautiful pottery vase and end up with an abstract masterpiece!
Want to experiment? Try using lemon juice instead of vinegar for a slightly different flavor. It’s a fun twist that’ll keep your palate guessing!
Don’t hesitate to get your kids involved! Cheese-making can be a fantastic kitchen science experiment. Plus, watching them eat the fruit of their labor will make all the chaos worthwhile.
FAQs About Homemade Cheese
Can I substitute whole milk with low-fat or non-dairy milk?
While you can use low-fat milk, cheese made with whole milk yields a creamier texture. Non-dairy alternatives typically won’t yield the same results, but feel free to experiment!How can I store leftovers?
Keep your homemade cheese in an airtight container in the fridge, where it should stay fresh for about a week.Can I freeze homemade cheese?
While it’s best fresh, you can freeze it! Just be aware it may change in texture once thawed.
Embrace Your Cheesy Side
With your own homemade cheese in your fridge, you’re now equipped to elevate any meal. Top it on a salad, smear it on crackers, or use it in cooking—endless possibilities await!
Remember, it’s not just about the cheese; it’s about the love, creativity, and memories created along the way. So grab your apron, channel your inner cheese mastermind, and have a blast! Each bite will be a testament to your culinary journey, and trust me, your loved ones will be singing your praises.
Your kitchen will smell like heaven, and those who gather around your table will be truly impressed. Now, go forth and spread that homemade goodness lovingly!
And for even more kitchen inspiration, don’t miss checking out my other recipes, like my Decadent Chocolate Cake or explore Easy Weeknight Dinners for busy evenings.
Meta Description
Homemade cheese is the perfect recipe for your next culinary adventure. Quick, easy, and delicious, this dish will become your go-to delight. Try it today!
Homemade Cheese
Ingredients
Method
- In a large saucepan, pour in the gallon of whole milk and heat it over medium heat until steaming but not boiling.
- Once warm, reduce the heat to low and stir in the vinegar. Allow it to sit for about 10 minutes to let the curds and whey separate.
- Grab a fine mesh strainer and line it with a cheesecloth or coffee filter. Pour the curds and whey into the strainer to drain the liquid.
- After draining, place the curds in a bowl and mix in salt to taste. Add any optional ingredients like herbs or spices if desired.
- Transfer the cheese into a container and refrigerate for at least an hour before enjoying.