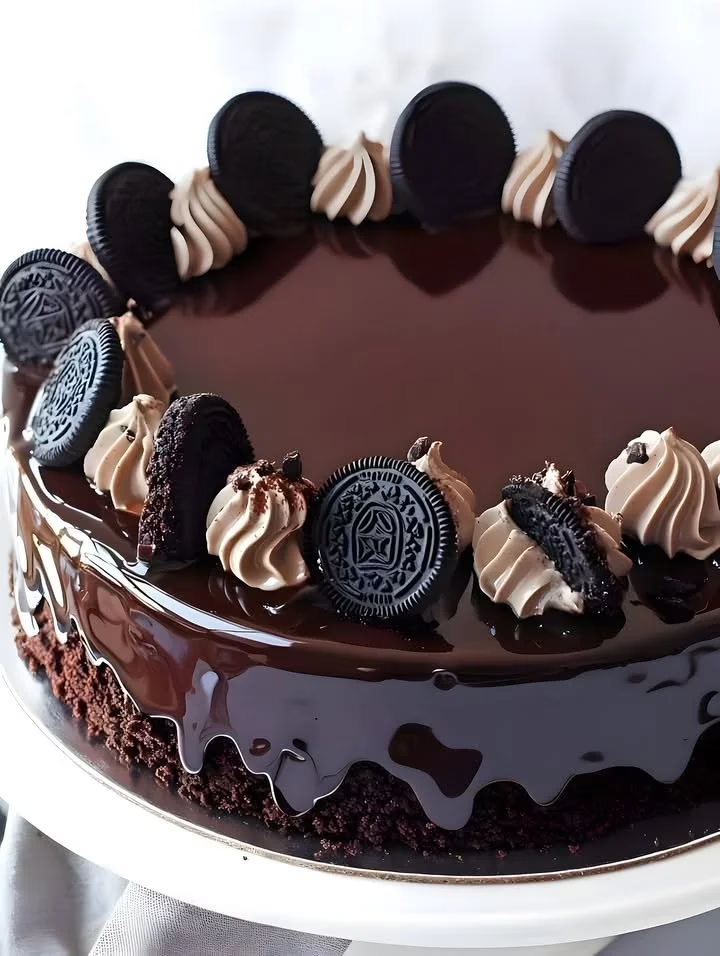
Decadent Dark Chocolate Mirror Glaze: The Showstopper Your Desserts Deserve
If you’re looking for a way to elevate your desserts and make them truly shine, you’ve stumbled upon the perfect recipe with this Dark Chocolate Mirror Glaze. This glossy, irresistible glaze not only tastes fantastic but also transforms your baked goods into stunning masterpieces worthy of a bakery display. Whether you’re planning a cozy family dinner, a birthday party, or just want to impress your friends (or yourself, let’s be real), this glaze is your secret weapon.
Why You’ll Love This Dark Chocolate Mirror Glaze
Let’s be honest: life can often feel like a juggling act, especially for busy women who balance careers, families, and, let’s say, the occasional Netflix binge. Luckily, impressing your loved ones doesn’t have to be a Herculean task. This dark chocolate mirror glaze is not only simple to make but packed with flavor and drama. Plus, it’s a fun way to unwind—picture yourself in the kitchen, a spatula in hand, creating something utterly beautiful. Trust me, the moment you pour this glossy wonder over your cake, you’ll feel like a culinary rock star.
Ingredients
Before we dive into the majestic magic of this glaze, let’s gather your ingredients. Here’s what you’ll need:
- 1 cup heavy cream
- 8 oz dark chocolate (70% cocoa works beautifully)
- 1/2 cup corn syrup
- 1 teaspoon vanilla extract
- Pinch of salt
Pro Tip: Make sure your chocolate is finely chopped to help it melt smoothly. You know what they say—chocolate is the answer to most of life’s problems… or at least it makes them a whole lot sweeter!
Steps to Create Your Dark Chocolate Mirror Glaze
Prep Your Chocolate: In a medium bowl, place the chopped dark chocolate. It’s getting cozy in there, so let’s unleash the magic on the next step!
Heat the Cream: In a saucepan over medium heat, combine the heavy cream and corn syrup. Stir frequently until just boiling. Be careful not to let it go too far; we’re making a glaze, not breakfast scrambled eggs!
Pour and Stir: Once it reaches a boil, pour the hot mixture over the chocolate. Add a pinch of salt and the vanilla extract, then let it sit for a few minutes. This is where the magic happens. You can feel the anticipation in the air, can’t you?
Blend It All Together: After a few minutes, whisk the mixture gently until it’s super smooth and shiny. If you have an immersion blender, now’s the time to use it. Just imagine that glossy sheen!
Cool It Down: Let your glaze cool to room temperature. It’s crucial not to rush this part; if it’s too hot, it’ll run right off your dessert like a kid in a candy store.
Drizzle Time: Once your glaze has thickened slightly and is around 90°F (the sweet spot!), it’s time to pour it over your cake. Ensure your cake or dessert of choice is on a wire rack over a baking sheet to catch any drips. You want it to look like a glossy, chocolaty waterfall—nature’s beauty at its best!
Set and Serve: Allow the glaze to set for about 10 to 15 minutes before slicing into your masterpiece. Trust me; the anticipation will only make it taste better.
Cooking Tips for Success
Chill the Cake: For the best results, chill your cake before pouring on the glaze. It helps the glaze set beautifully, creating that coveted shiny surface!
Don’t Stress: If your glaze isn’t perfectly smooth or you notice a few bubbles, don’t worry! Those little imperfections add character and make your cake uniquely yours—just like you!
Flavor It Up: Feel free to spice things up! Add flavored extracts like peppermint or almond to give your mirror glaze a unique twist. Think of it as accessorizing; a little flair goes a long way!
A Personal Touch
The first time I tried making a mirror glaze, let’s just say my kitchen looked like a chocolate explosion! But when I finally poured that glossy beauty over my cake and saw everyone’s eyes light up, it was pure magic. It became my go-to showstopper for family gatherings—everyone wants a slice of that shiny creation.
FAQs About Dark Chocolate Mirror Glaze
Can I use milk chocolate instead?
Of course! Just keep in mind that it will be sweeter, and the glaze won’t be as dark.How can I store leftovers?
If you have any glaze left (unlikely, but let’s be hopeful!), store it in an airtight container in the fridge for up to a week. Just reheat it gently before using again.Can I use this glaze on cupcakes or cookies?
Absolutely! This glaze works wonderfully on various desserts. Get creative!
The Bottom Line
In mastering the art of Dark Chocolate Mirror Glaze, you’re not just creating a dessert; you’re also crafting delightful memories for yourself and your loved ones. So the next time you find yourself in the kitchen, remember to take a moment to enjoy the process. Life’s a little sweeter when you whip up something special, and a glossy glaze might just be what you need to brighten your day.
Ready to dive into more delicious adventures? Check out our family-friendly dessert recipes or learn how to make a classic chocolate cake that will pair perfectly with your dazzling mirror glaze!
Meta Description
Dark Chocolate Mirror Glaze is the perfect recipe to elevate your desserts. Quick, easy, and delicious, it will impress everyone at your next gathering!
Dark Chocolate Mirror Glaze
Ingredients
Method
- In a medium bowl, place the chopped dark chocolate.
- In a saucepan over medium heat, combine the heavy cream and corn syrup. Stir frequently until just boiling.
- Once it reaches a boil, pour the hot mixture over the chocolate. Add a pinch of salt and the vanilla extract, then let it sit for a few minutes.
- After a few minutes, whisk the mixture gently until it’s super smooth and shiny. If you have an immersion blender, use it now.
- Let your glaze cool to room temperature; do not rush this stage.
- Once the glaze has thickened slightly and is around 90°F, pour it over your cake on a wire rack over a baking sheet.
- Allow the glaze to set for about 10 to 15 minutes before slicing.