Title: Chocolate Peanut Butter Brownie Bars — A Quick, Crowd-Pleasing Dessert for Busy Days
Chocolate Peanut Butter Brownie Bars show up when you need a little chocolate comfort without a lot of fuss. Whether you’re juggling carpools, deadlines, or the never-ending laundry pile, these bars are fudgy, peanut-buttery, and exactly the kind of treat that makes small victories taste sweeter. I’m Anna — cooking with my sister Patricia has taught me that simple ingredients and a little bit of love go a long way, and this recipe is living proof.
If you love peanut butter treats, you might also enjoy my playful take on peanut butter balls with chocolate rice krispies — they’re a portable hit for school parties and snack boxes.
Why You’ll Love Chocolate Peanut Butter Brownie Bars
- They’re faster than a full cake but every bit as comforting.
- Kid-approved: picky eaters rarely resist the chocolate + peanut butter combo.
- Make them ahead for parties, school lunches, or a weekend treat stash.
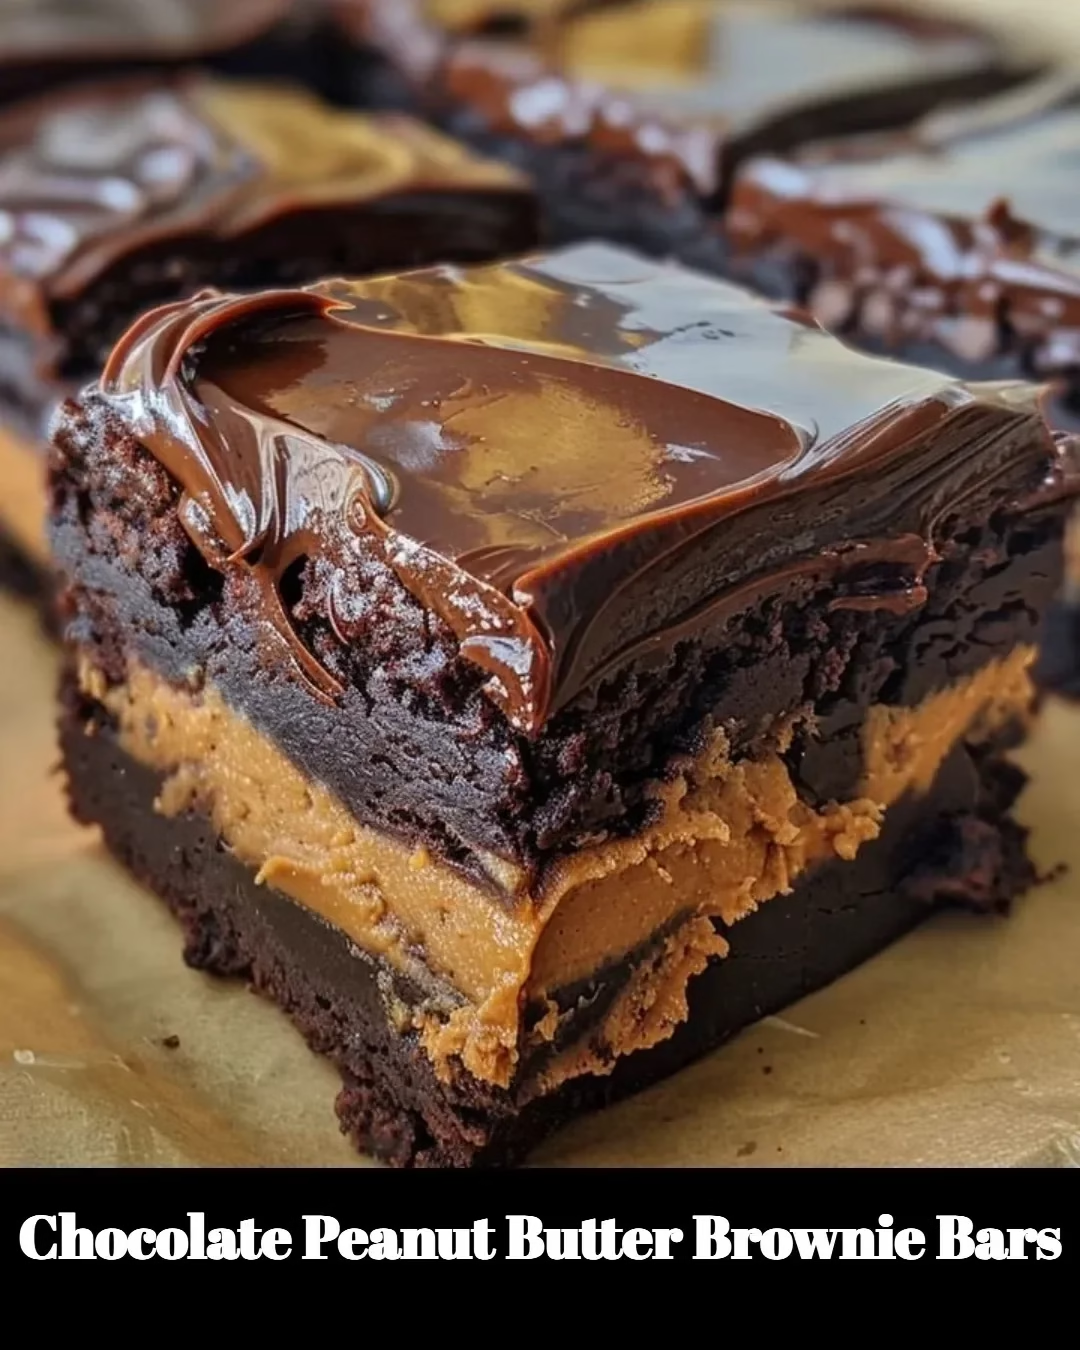
- They strike a perfect balance between fudgy brownie and creamy peanut butter swirl.
Ingredients (9×13-inch pan)
Brownie layer
- 1 cup (226 g) unsalted butter
- 2 cups (400 g) granulated sugar
- 4 large eggs, room temperature
- 1 tablespoon vanilla extract
- 1 cup (85 g) unsweetened cocoa powder
- 1 cup (125 g) all-purpose flour
- 1/2 teaspoon salt
- 1/2 teaspoon baking powder
Peanut butter swirl
- 1 1/4 cups (320 g) creamy peanut butter (natural or classic, your call)
- 1/2 cup (60 g) powdered sugar
- 4 tablespoons (56 g) unsalted butter, softened
- 1 teaspoon vanilla extract
Chocolate glaze (optional but lovely)
- 3/4 cup (130 g) semi-sweet chocolate chips
- 2 tablespoons heavy cream or milk
- Sea salt for finishing (optional)
Yield: About 24 squares
Step-by-step Directions
Prep the pan and oven
- Preheat oven to 350°F (175°C). Line a 9×13-inch baking pan with foil or parchment, letting excess hang over the sides for easy lifting. Lightly grease the lining.
Make the brownie batter
- In a small saucepan, melt the butter over low heat (or microwave in 20-second bursts). Remove from heat and whisk in the sugar until glossy.
- Add the eggs one at a time, whisking after each until smooth. Stir in the vanilla.
- Sift the cocoa powder, flour, salt, and baking powder over the wet mixture. Fold gently with a spatula until just combined — don’t overmix. The batter should be thick and fudgy.
Layer the pan
- Spread about two-thirds of the brownie batter into the prepared pan, smoothing the top with an offset spatula. Save the remaining batter for the top layer.
Make the peanut butter swirl
- In a medium bowl, beat the peanut butter, powdered sugar, softened butter, and vanilla with a fork or paddle until creamy and spreadable. If it’s too thick, add 1 teaspoon of milk at a time until it reaches a spreadable texture.
- Dollop spoonfuls of the peanut butter mixture across the brownie layer. Use the back of a spoon to gently spread, leaving gaps so chocolate shows through.
Finish the top
- Drop spoonfuls of the reserved brownie batter over the peanut butter layer. Use a knife or skewer to gently swirl the two layers together for a marbled effect. Less is more here — a few swirls look prettier and bake more evenly.
Bake
- Bake 25–30 minutes, or until the top is set and a toothpick inserted near the center comes out with a few moist crumbs (not raw batter). Oven times vary; start checking at 22 minutes.
Add the glaze (optional)
- Let the bars cool in the pan for 20 minutes. For a shiny finish, warm the chocolate chips and cream together in 20-second bursts, stirring until smooth. Spread over the cooled bars and sprinkle lightly with sea salt.
Chill and slice
- Refrigerate for at least 1 hour to set the swirl and glaze. Use the parchment overhang to lift the bars from the pan, then slice into squares with a sharp knife warmed briefly under hot water for cleaner cuts.
Cooking Tips (because small kitchen wins matter)
- Use room-temperature eggs for a smoother batter. If you forgot to set them out, run them under warm water for a minute.
- Prefer natural peanut butter? Stir it well before measuring. It can be looser, so reduce added liquid if your swirl seems runny.
- Want extra fudgy bars? Bake at the lower end of the time range and pull them while a few moist crumbs cling to the toothpick.
- For a nut-free household, swap the swirl for a white chocolate or cookie-butter filling, or check out variations like my crunchy chocolate bars for texture inspiration: caramel chocolate crunch bars.
- Leftover bars keep well in the fridge for up to 5 days in an airtight container. For longer storage, freeze slices in a single layer on a tray, then transfer to a freezer-safe bag for up to 3 months.
A short kitchen story (because recipes feel like home)
Patricia and I first made these bars on a rainy afternoon when our kids had a day off school and pantry supplies were limited. We mixed what we had: butter, cocoa, and a jar of peanut butter. Within an hour, the house smelled like chocolate, the kids were sticky and happy, and even the grumpiest teen declared them “actually amazing.” Now they’re my go-to for potlucks and impromptu coffee visitors. They’re the kind of treat that says, “I see you — here’s something comforting.”
Why the peanut butter swirl works
The peanut butter swirl lends a creamy, slightly salty contrast that balances the intense chocolate. It also makes the bars less sweet on the palate, which is why adults often reach for a second square and kids ask for thirds. If you’re experimenting, try crunchy peanut butter for extra texture or mix in a few chopped peanuts for a nutty crunch.
Variations and swaps (use these to fit your pantry)
- Small batch? Halve the recipe and bake in an 8×8-inch pan; check bake time earlier (about 20–25 minutes).
- Healthier tweaks: use half brown sugar and half coconut sugar, swap some flour for almond meal (reduces gluten — texture will change), or use dark chocolate for the glaze.
- Gluten-free: replace the flour with a 1:1 gluten-free flour blend.
- Nut-free option: use cookie butter or sunbutter for the swirl but keep in mind sunflower butter has a stronger flavor.
FAQs
Q: Can I use natural peanut butter that separates?
A: Yes — stir well first. If it’s very runny, add a little powdered sugar so the swirl holds its shape.
Q: Can I make these ahead for a party?
A: Absolutely. Bake, cool, and keep chilled for up to 48 hours. Bring to room temperature 20–30 minutes before serving for soft squares.
Q: How can I make this a gluten-free brownie bar recipe?
A: Substitute a 1:1 gluten-free flour blend for the all-purpose flour and follow the rest of the recipe the same way.
Q: Are these bars freezer-friendly?
A: Yes. Freeze baked and cooled squares in a single layer, then move them to an airtight container for up to 3 months. Thaw in the fridge or on the counter.
Q: Can I use crunchy peanut butter?
A: Sure! Crunchy peanut butter gives a pleasant texture. If you prefer a smoother swirl, stick with creamy.
Serving ideas
- Warm with a scoop of vanilla ice cream for the ultimate treat.
- Cut into bite-sized bars to serve at showers or meetings — one tray goes a long way.
- Pack a few in lunchboxes (in an insulated compartment) for a special school-day surprise.
Why this recipe fits busy lives
You don’t need fancy equipment, and most of the ingredients are pantry staples. The hands-on time is about 20–30 minutes; then the oven does the rest. For busy moms or professionals who want to bring a homemade dessert to a gathering without stress, this recipe hits the sweet spot between fast and impressive.
A quick troubleshooting guide
- Batter too thick for swirling? Microwave the peanut butter mixture for 10 seconds and stir; it will loosen up.
- Top is cracking excessively? You probably baked a few minutes too long — pull them sooner next time.
- Swirl sank to the bottom? The panda move: try dropping smaller dollops and swirl gently; heavy spreads can pull down.
Want more peanut butter dessert ideas?
If you’re on a peanut-butter kick (and why wouldn’t you be?), my peanut butter balls are an easy no-bake treat for gifting and holiday trays — check them out above. For a different texture and caramel-y spin, try the caramel chocolate crunch bars linked in the tips.
Conclusion
These Chocolate Peanut Butter Brownie Bars are a dependable, comforting dessert that fits right into a busy schedule — fudgy chocolate layered with a creamy peanut butter swirl. For a slightly different take and extra inspiration, see this Peanut Butter Brownie Bars Recipe {Peanut Butter Topped Brownies} and this small-batch option at Peanut Butter Brownie Bars (Small Batch) – Cloudy Kitchen. Happy baking — and don’t forget to snag a square for yourself before the rest disappear!
Meta description:
Chocolate Peanut Butter Brownie Bars: quick, easy, and irresistible dessert for busy families. Rich chocolate meets creamy peanut butter—bake today!!!
(Note: If you’d like a printable card version of the recipe or a smaller batch, tell me — I’ll scale it and format it just for you.)
Chocolate Peanut Butter Brownie Bars
Ingredients
Method
- Preheat oven to 350°F (175°C). Line a 9x13-inch baking pan with foil or parchment, letting excess hang over the sides for easy lifting. Lightly grease the lining.
- In a small saucepan, melt the butter over low heat (or microwave in 20-second bursts). Remove from heat and whisk in the sugar until glossy.
- Add the eggs one at a time, whisking after each until smooth. Stir in the vanilla.
- Sift the cocoa powder, flour, salt, and baking powder over the wet mixture. Fold gently with a spatula until just combined — don’t overmix. The batter should be thick and fudgy.
- Spread about two-thirds of the brownie batter into the prepared pan, smoothing the top with an offset spatula. Save the remaining batter for the top layer.
- In a medium bowl, beat the peanut butter, powdered sugar, softened butter, and vanilla with a fork or paddle until creamy and spreadable.
- If it’s too thick, add 1 teaspoon of milk at a time until it reaches a spreadable texture.
- Dollop spoonfuls of the peanut butter mixture across the brownie layer. Use the back of a spoon to gently spread, leaving gaps so chocolate shows through.
- Drop spoonfuls of the reserved brownie batter over the peanut butter layer. Use a knife or skewer to gently swirl the two layers together for a marbled effect.
- Bake for 25–30 minutes, or until the top is set and a toothpick inserted near the center comes out with a few moist crumbs. Oven times vary; start checking at 22 minutes.
- Let the bars cool in the pan for 20 minutes. For a shiny finish, warm the chocolate chips and cream together in 20-second bursts, stirring until smooth.
- Spread over the cooled bars and sprinkle lightly with sea salt.
- Refrigerate for at least 1 hour to set the swirl and glaze. Use the parchment overhang to lift the bars from the pan, then slice into squares with a sharp knife warmed briefly under hot water for cleaner cuts.